Manual of DeepSec
The manual of DeepSec is also available in PDF.
Tutorial
- Part 1: Modelling a protocol and a security property
- Part 2: Verification in practice
The Private Authentication Protocol
We will now explain protocol verification in DeepSec through an example. As DeepSec specializes in verifying equivalence properties, mainly used for modelling privacy preserving properties, we will use the Private Authentication Protocol (PAP) as our example [1]. The protocol can be described in “Alice & Bob” notation as follows:
  A -> B: aenc( (Na,pk(skA)), pk(skB) )
  B -> A: aenc( (Na,Nb,pk(skB)), pk(skA) )     if B accepts requests from A
          aenc( Nb, pk(skB) )                  otherwise
Alice (A) makes a connection request to Bob (B). For this Alice sends the asymmetric encryption (aenc) of the pair (Na,pk(skA) with Bob’s public key (pk(skB)). Here Na is a fresh random nonce and pk(skA) is Alice’s public key. The term pk(sk) denotes the public key corresponding to the private key sk. Bob may accept requests from Alice or not.
The aim of the protocol is to conceal from outside observers whether Bob does accept connections from Alice or not: this is called private authentication. If Alice is in the list of connections accepted by Bob, Bob replies with the message aenc( (Na,Nb,pk(skB)), pk(skB) ), i.e. the encryption of the tuple (Na,Nb,pk(skB)) (where Nb is a fresh nonce generated by Bob) with Alice’s public key pk(skA). Otherwise, in order to hide the connection refusal, Bob sends a decoy message aenc( Nb, pk(skB) ).
The modelling of the PAP protocol in DeepSec is available in the file
in the deepsec directory. We suggest that you move to that directory and make sure that the deepsec executable is in your path.
Modelling messages in DeepSec
As in other symbolic models, protocol messages are modelled as terms. Therefore the first part of a DeepSec file consists in the necessary declarations. To model PAP we first declare a few constants.
Here, c is a so-called free name: free names model public constants, that are known to the adversary. In PAP c will be a channel name, as we will see below. On the other hand we need to declare secret keys. For this we use private names ska, skb, skc that are declared with the additional attribute [private].
Next, we need to declare function symbols to represent asymmetric encryption.
The function symbol aenc is declared to be of arity 2 using the notation /2. Public keys are of arity 1, as they are intended to take a secret key as argument.
Note: public names vs function symbols of arity 0
It is possible to declare function symbols of arity 0, e.g. write
fun c/0, orconst c. This is equivalent to declaring a free namefree c.
Note: alternate modelling of secret keys using private function symbols
In the modelling proposed above, we intend to compute the public key by applying the function
pkto the secret key, e.g.pk(ska)would be A’s public key. An alternate way of modelling can be to derive both the public and secret key from an identity: we could declare a private function symbolfun sk/1 [private].. Then,pk(a)andsk(a)represent A’s public, respectively private, key. Declaring the function symbolskas private implies that the attacker cannot apply this function symbol.
Currently, we have declared function symbols aenc and pk, but nothing indicates that these functions represent asymmetric encryption. We will use rewrite rules to give meaning to these function symbols.
This rule indicates that an attacker can apply decryption adec; if the keys match (which is required as we use the same variable y as arguments in encryption and decryption) then the result of applying decryption returns the plaintext x.
Note: constructor-destructor algebras
You may have noticed that we did not declare the
adecsymbol. This is becauseadecis a destructor, while declared function symbols are constructors. Destructors may actually not occur in protocol messages: if the above rewrite rule does not succeed the evaluation will fail. For example, the evaluation of the termsadec(aenc(m,pk(ska)),skb)andadec(c,ska)would both fail.
Note: deterministic vs randomized encryption
You may also note that we modelled encryption as a deterministic function. Of course, a secure encryption scheme needs to be randomized, but in this particular example this simplified version is sufficient. This means in particular that the attacker can distinguish messages
aenc(0,pk(ska))andaenc(1,pk(ska))where0and1are constants as he could simply re-encrypt these constants (supposing he knows the public key). It is however easy to model asymmetric encryption by adding a random element, makingaenca ternary function.
Note: multiple rewrite rules for a single destructor
Note that if a destructor function require several rewrite rules, they should be defined inside the same reduc. For example:
Modelling protocols as processes
We now need to model the behaviour of Alice and Bob. One can think of a protocol as a distributed program. Each local program of this system will be represented by a process. We can model Alice’s role by the following process processA.
The process has 2 arguments: ska is the secret key of the agent running this process, and pkb is the public key of the agent to whom we want to connect. First, the process generates a fresh random nonce using the command new na. Next, it sends on channel c the encryption of the pair (na,pk(ska)) encrypted with the recipient’s public key pkb, as dictated by the protocol. Finally, the process expects an input, modelled as in(c,x). Normally, one would expect additional processing of the input message, which we omit here for simplification.
Note private names vs new names
In the above example we use
new nato create a fresh, private name na. This is again equivalent to declaring a free, private name, as we did forska, skbandskb. However, thenewconstruct is useful when a different, fresh name should be created in every instance of the process: if we execute several instances ofprocessAa distinct fresh namenais created in each copy.
Next, we model Bob’s behaviour by the process processB.
  let processB(skb,pka) =
    in(c,yb);
    new nb;
    let (yna,=pka) = adec(yb,skb) in
      out(c,aenc((yna,nb,pk(skb)),pka))
    else out(c,aenc(nb,pk(skb))).
This process introduces several new constructs that require explanations. The first action of the process is to input a message on channel c through the instruction in(c,yb). As a consequence the message that is received will be bound to the variable yb. While the expected message is aenc((na,pka)),pk(skb)) we need to keep in mind that this message may actually be provided by the attacker and may be an arbitrary message the attacker is able to forge. Therefore we need to parse the message and perform a number of tests. All of this is done here in a condensed form using a let instruction. We first decrypt (apply adec) the received message (referred to by the variable yb) with the secret key skb. Note that if decryption fails, we will enter the else branch of the let instruction. Next, we check that the results is a pair: the first element of the pair is bound to the variable yna and we check that the second variable of the pair equals the public key pka, i.e., the public key of a person we accept connections from. An expanded form could be written as follows.
   let yplain = adec(yb,skb) in
      let (yna,ypka) = yplain in
         if ypka = pka then
            out(cb,aenc((yna,nb,pk(skb)),pka))
         else out(cb,aenc(nb,pk(skb)));
      else out(cb,aenc(nb,pk(skb)));
   else out(cb,aenc(nb,pk(skb))).
This form is however rather lengthy and requires duplicating else branches, which is why the above syntactic sugar is often convenient.
Note: tuples in DeepSec
We have seen in the above example that we used notations
(a,b)and(a,b,c)for tuples without explicitly declaring function symbols for pairs and triples. Actually, DeepSec has built-in support for tuples. For each tuple of arity n occurring in the processes DeepSec will define the constructor(_, ... ,_)of arity n and corresponding destructorsreduc proj_i_n (x1, ... ,xi, ..., xn) = xi(for all 1 ≤ i ≤ n). These destructors are used implicitly in the let instruction for projecting the elements of the tuple.
Finally, we put all the pieces together in main process ProcessAB modelling the entire system.
  let ProcessAB =
    out(c,pk(ska));
    out(c,pk(skb));
    out(c,pk(skc));
    (
      processA(ska,pk(skb)) | processB(skb,pk(ska))
    ).
The system first outputs the public keys, so that they become known to the attacker. Then the system indicates that processes processA and processB are executed in parallel (each with its parameters).
Verifying private authentication
We are now interested in modelling anonymity. Anonymity is generally modelled as the indistinguishability of two systems. We therefore define a second system ProcessCB.
  let ProcessCB =
    out(c,pk(ska));
    out(c,pk(skb));
    out(c,pk(skc));
    (
      processA(skc,pk(skb)) | processB(skb,pk(skc))
    ).
The difference with previous system ProcessAB is the parameter skc, rather than ska, given to processA and processB. Hence, ProcessAB models the situation where B is willing to receive connections only from A, while in ProcessCB, B accepts connections only from C. The goal of private authentication is to hide from whom connections are accepted. Indistinguishability can be modelled by trace equivalence. We can therefore query DeepSec to check trace equivalence between these two systems.
To verify this query we use the command
DeepSec will indeed confirm that this kind of anonymity is satisfied by outputting (among some other messages) that
Looking at the protocol this is intuitively possible thanks to the decoy message sent in the else branch of processB. What happens when we remove the decoy message? For this we simply replace the else branch with else 0 (or, equivalently, omit it completely), see the file PrivateAuthentication-1session-attack.dps. We can now run DeepSec on this modified file.
This time, DeepSec will report an attack:
Indeed, when the attacker sends the message aenc((n,pk(ska)),pk(skb)) to B, only the first system will send a reply.
Note: multiple input files
DeepSec can take several files as input. For example you may run
More complex scenarios
In the previous section we considered a very simple scenario and our verification checked whether private authentication holds when we have one instance of A and B. Often, protocols may be secure when considering a single session, but attacks may arise when multiple sessions are executed in parallel.
Let us see what happens when we consider two instances of each role resulting into the following declarations.
  let ProcessAB =
    out(c,pk(ska));
    out(c,pk(skb));
    out(c,pk(skc));
    (
      processA(ska,pk(skb)) | processB(skb,pk(ska)) | // B expects to talk to A
      processA(ska,pk(skb)) | processB(skb,pk(ska))   // B expects to talk to A
    ).

  let ProcessCB =
    out(c,pk(ska));
    out(c,pk(skb));
    out(c,pk(skc));
    (
      processA(skc,pk(skb)) | processB(skb,pk(skc)) | // B expects to talk to C
      processA(ska,pk(skb)) | processB(skb,pk(ska))   // B expects to talk to A
    ).
Note: bounded replication
When considering multiple sessions it is common to put in parallel several identical instances. For example, the process
ProcessABduplicatesprocessA(ska,pk(skb))andprocessB(skb,pk(ska)). In more complex scenarios we may want to copy more processes a large number of times. Therefore DeepSec provides a convenient operator!^n:!^n Pis syntactic sugar fornparallel copies of P wherenis a positive integer. In the above examplecould have been replaced by
We can run
and observe that still no attack is found. However, the verification time increases: while the result is instantaneous for 1 session it now takes several seconds on a standard laptop. This is due to the fact that DeepSec has to explore all possible interleavings, whose number is exponential.
While the verification time is still moderate for 2 sessions this is not the case anymore when we add a third session.
will take much longer. How can we ensure that the protocol cannot be attacked with 3 sessions, or more?
Speeding up the verification
Acceleration technique 1: distributing the computation
A first way to scale up is to distribute the computation. By default, DeepSec checks how many physical cores your machine has and distributes the computation on these cores by creating the same amount of workers. To activate the distributed computation with a different number of workers, deepsec should be run with the option -l n (or --local_workers n) where n is the number of desired local workers.
It is also possible to distribute computation on several machines. To do so, deepsec requires an ssh connexion between the localhost and the distant machine, using ssh key authentication, so that no password is required. The computation on a distant machine is configured with the command line option -w <host> <path> <n> (or --distant_workers <host> <path> <n>). The parameter <host> is the ssh login and address (e.g my_login@my_host). The parameter <path> should indicate the path to the deepsec directory on the distant machine. Finally, the parameter <n> represents the number of cores that should be dedicated by this distant machine to the computation of the input file.
Note that the option -distant_workers must be used for each distant machine.
In this command line, the first machine should be accessible with ssh login1@host1 and the deepsec directory should be located at ~/tools/deepsec on this machine. Similarly, the second machine should be accessible with ssh login2@host2 and the DeepSec directory should be located at ~/deepsec. If the connexions to both machines are successful, DeepSec will distribute the computation between the local and the 2 distant machines: 15 cores are used on the first machine and, by specifying auto, all available physical cores on the second machine.
Important: The localhost and distant machines must have exactly the same version of DeepSec (the Git hash is displayed when running
deepsecwithout parameters or with the option--help), compiled with the same version of OCaml.
Acceleration technique 2: session equivalence
Distribution of the computation may gain a constant speed-up factor: going from a 20 hours computation to a 1 hour computation is indeed much appreciated, but may not solve the more fundamental problem of the exponential blowup.
This is why DeepSec proposes another, more efficient proof technique. The underlying idea is to prove a finer equivalence relation, that we call equivalence by session. This equivalence significantly decreases the number of interleavings by exploiting the structure of the processes. Indeed, often, we want to show the equivalence of processes that are of the form
The rough idea of equivalence by sessions is to match parallel sessions rather than individual actions. Here, for instance, one may try to match all actions of P1 by all actions of say Q3, all actions of P2 by all actions of Q1, etc. DeepSec still needs to explore all possible such matches, but their number is often lower by an exponential factor compared to the number of all possibles matches of actions. Besides, this equivalence allows many more optimisations than the initial trace equivalence (see Partial order techniques below).
For example, we may try to verify a complex scenario with 5 sessions on PAP.
Now this computation terminates in about a minute on a standard laptop (with two cores). Distributing this computation could of course improve further the verification time.
Note: Equivalence by session and false attacks
Why shouldn’t one always use the more efficient equivalence by session ? As explained above equivalence by session is a stronger equivalence than trace equivalence. Therefore whenever equivalence by session is satisfied, trace equivalence also holds, but the converse may not be true. Therefore equivalence by session may lead to a false attack (with respect to trace equivalence). This is witnessed by the following small example
  let P = out(c,a) ; out(c,a).
  let Q = out(c,a) | out(c,a).
  query trace_equiv(P,Q).
  query session_equiv(P,Q).
and can be tested using DeepSec.
Note: Syntactic restriction
The theory of equivalence by session requires that all channels are only (public or private) names or constants, i.e., no complex terms, nor variables.
Acceleration technique 3: Partial-order reductions
Probably the most effective way to fight state explosion are partial order reduction (POR) techniques. Deepsec implements powerful POR optimisations, that were designed in [2] for accelerating the decision of trace equivalence. These techniques are however only sound on a class of action-determinate processes: a process is action determinate when it never can reach a state where two outputs, or two inputs on a same channel are executable. Moreover, the processes may not use private channels. A simple, sufficient criterion is to check that syntactically no outputs on a same channel appear in parallel, and similarly for inputs, and that all channels are public. Deepsec automatically checks this criterion, and when satisfied applies POR techniques.
A pragmatic way to ensure action determinacy is to use a different channel name for each process in parallel. It is easy to modify the specification of PAP in that way. This modelling allows for a spectacular efficiency gain. The verification of a scenario with 9 sessions terminates in a few seconds.
Again, one may wonder why one should not always use different channel names for parallel processes? Intuitively, using different channels for parallel sessions allows the attacker to identify the session that has sent the message. While this works well for the PAP protocol, some protocols precisely rely on this sender ambiguity to ensure some form of anonymity.
Note: POR, determinate processes and equivalence by session
As explained above, for proving trace equivalence, the partial-order reductions of DeepSec are only sound for the class of determinate processes. The situation is actually simpler for equivalence by session, for which these POR are sound for any process [3]. However, as witnesses by the examples provided so far in this tutorial, proving trace equivalence of determinate processes is significantly faster than proving equivalence by session of two non-determinate processes.
Note that combining the two acceleration techniques (i.e. proving the equivalence by session of determinate processes) does not further improve the performances. It is indeed proved in [3] that trace equivalence and equivalence by session coincide for determinate processes, and DeepSec therefore uses the same algorithm for both equivalences when determinacy is detected.
The DeepSec User Interface
DeepSec also comes with a graphical user interface (GUI). The GUI is intended to provide an easy to use environment for using DeepSec, browsing the results and simulating attacks as well as equivalence proofs.
The GUI is launched by executing the DeepSec UI application. This is a standalone application that communicates with DeepSec by making calls to the deepsec_api executable. Therefore, you should make sure that this executable is in your system path. (Otherwise we can manually configure the path to deepsec_api, see below).
When launching DeepSec UI you should arrive at the following welcome screen.
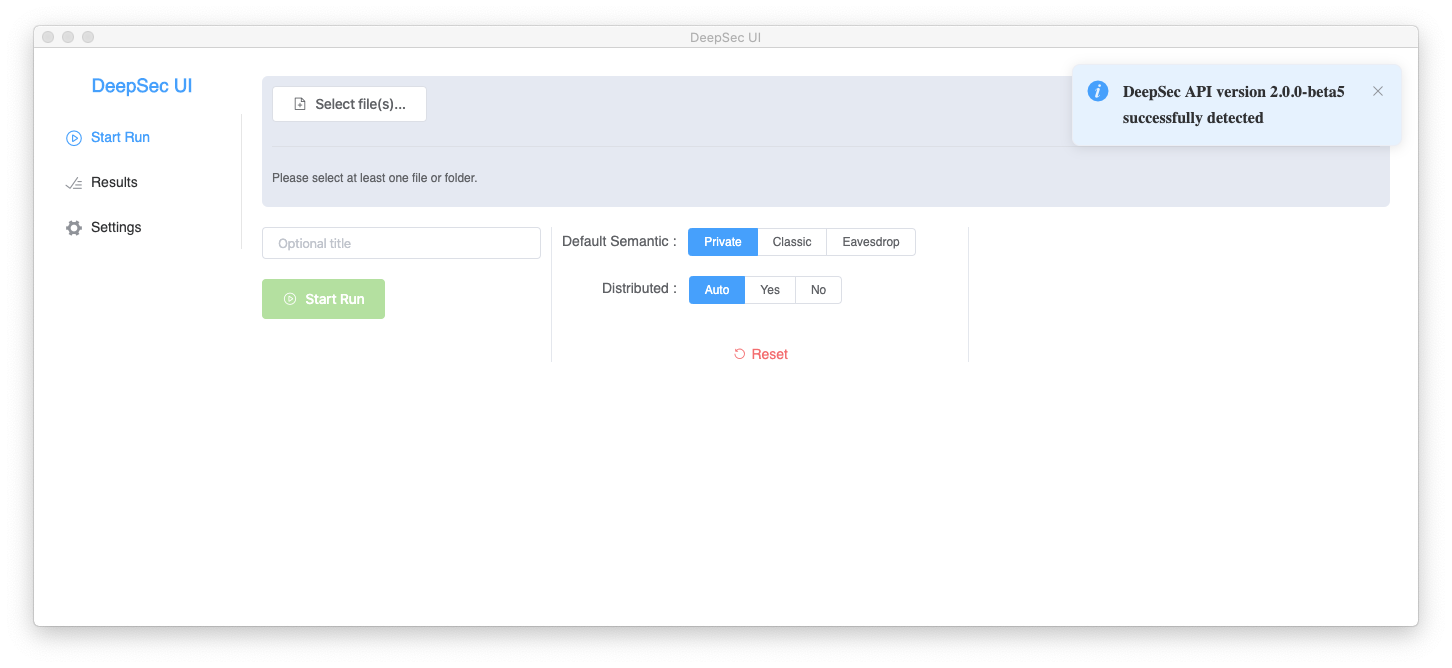
From this screen you can navigate through the 3 main sections of the GUI (displayed on the left):
- Start Run
- Results
- Settings
Normally you should see a “pop-up” confirming that deepsec_api has been successfully detected. If not you will get a warning pop-up. This notification only appears for a few second. If the executable was not detected you may manually specify the path by clicking on Settings and providing the Absolute Path of deepsec_api.

You may test that the executable is indeed available in the specified path by clicking on Check API.
We can now navigate back to the Start Run section and select the files with the specifications to be analysed. Let us select the pap-1-session and pap-1-session-attack that we used previously (available in Examples/tutorial/ in the DeepSec folder). The GUI allows you to select multiple files and such a collection of files is called a batch. Each file of this batch is called a run and such a run may contain multiple queries, as several queries may be specified in a same file.
In order to reference this batch we may provide a title, e.g. Tutorial. The Start Run section also allows for more advanced settings (Semantics, Distributed), but we currently keep the default settings.

We can now start the verification by clicking on the Start Batch button. Pop-up windows will notify about the status of the verification.
Navigating to the results section we now see the list of all previous verifications including the Tutorial batch.

Clicking on the tutorial batch we can display additional information. You may inspect the Run options and Versions to see the precise parameters and software versions used to run this batch.
Clicking on pap-1-session and then Query 1 allows to reveal additional information about the individual run and query.
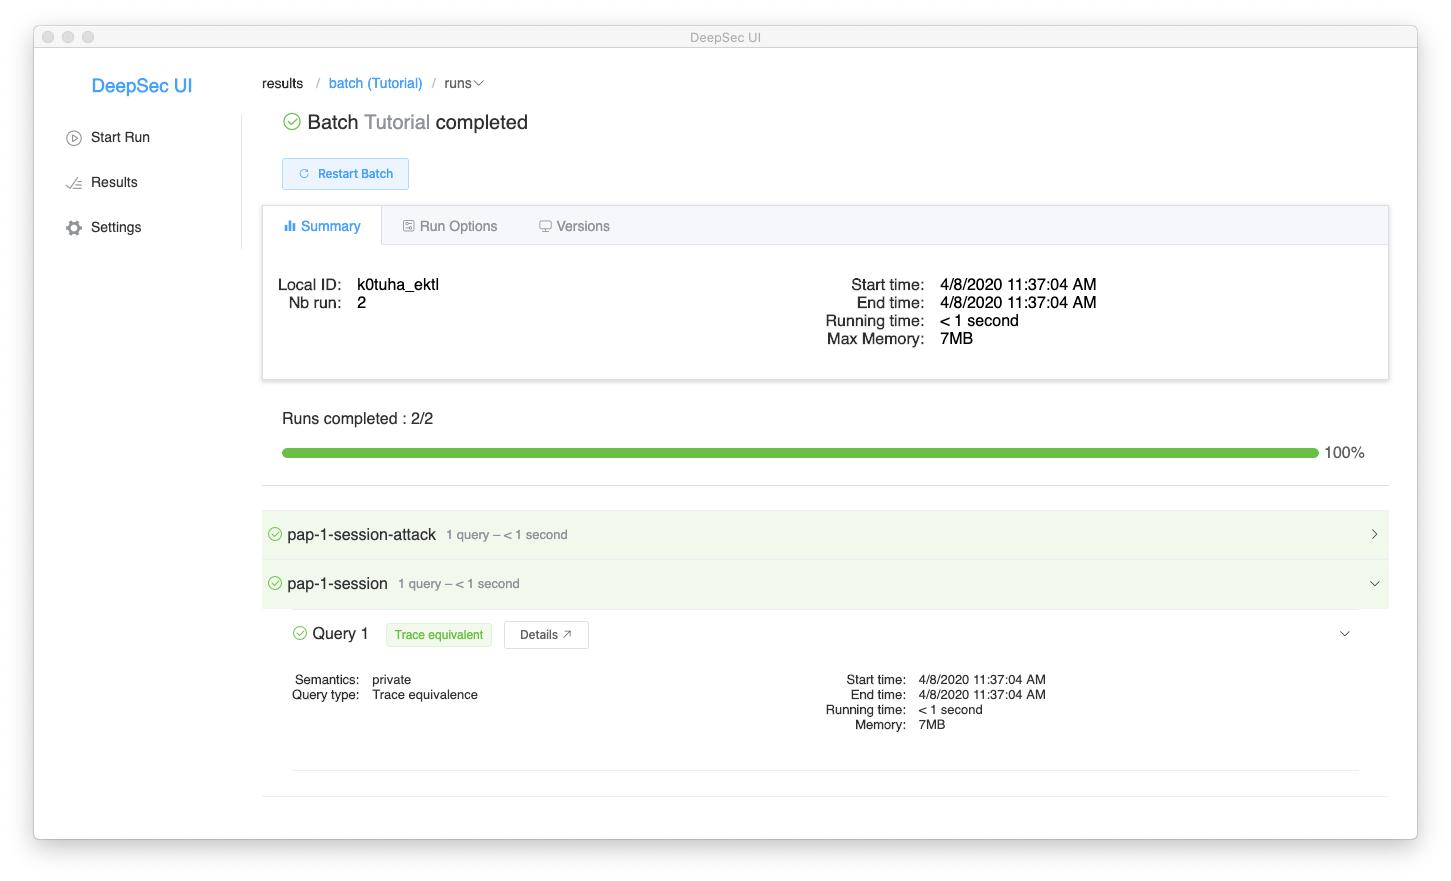
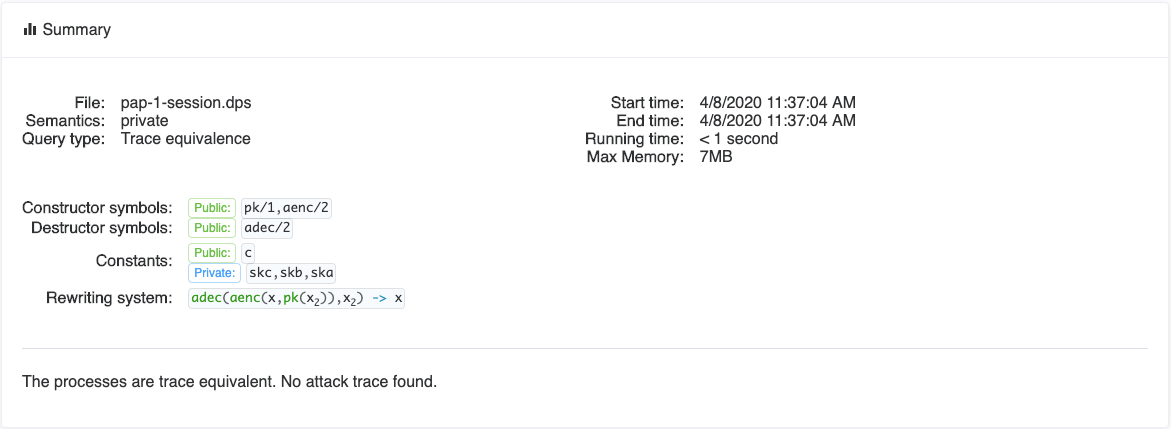
We can now inspect the Details of Query 1. The first part of the screen provides a summary of the query, recalling the declarations of the file and showing the result of the verification.
The second part shows the two processes of the query.
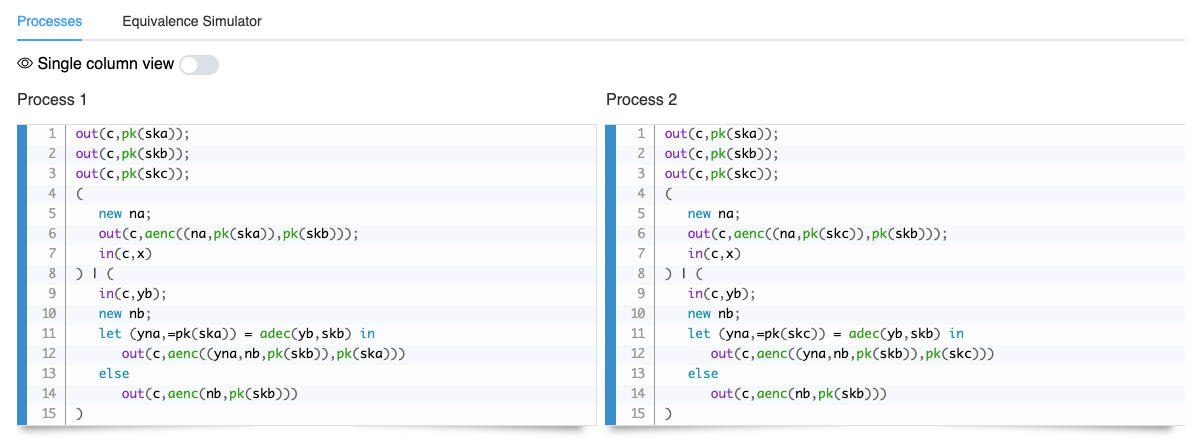
We may note that all processes defined by a let ... = ... construct have been inlined. An interesting functionality here is the Equivalence Simulator (click above the processes): it allows to define a trace on one process and have DeepSec find the equivalent trace on the other process. “Playing around” with the processes should allow the user to understand why the two processes are equivalent.
For instance, we could select a trace on Process 1. Available choices are highlighted and the user may select one of them.

Initially, a single action out(c,pk(ska)); is available and there is no other choice than select this one. This is a direct communication with the attacker on a channel; hence, the attacker needs to provide a recipe to compute this channel name. As here it is a constant c the tool proposes the recipe and we can simply validate. The three first actions do not offer any choice, and we can select the trace
resulting into the frame (which is the sequence of messages observed by an attacker spying on the communication network):
Next we have the choice between two actions out(c,aenc((na,pk(ska)),pk(skb))) and in(c,yb). Let us first select the output and then the input in(c,yb). Here we need to provide the recipe for the value to input (click on the “pencil”). Let’s say we want simply to forward the last output – the recipe for this is the last element of the frame and we may indicate ax_4. We see that this input satisfies the test in the let construct. Now we can select the output out(c,aenc((yna,nb,pk(skb)),pk(ska))) and require the tool to Find equivalent trace (above Process 2).
We can now “walk through” the equivalent trace using the <Prev and Next> buttons. We see that this results into a statically equivalent frame (i.e. a frame that is indistinguishable from the previous one for an outside observer).
You may also try to see what happens if you use a different recipe for in(c,yb):
aenc((#n,ax_1),ax_2)In this recipe the attacker encrypts himself a fresh name #n of his own (fresh names are prefixed by #) and pk(a) (specified by ax_1) with pk(b) (specified by ax_2). While this results in the same message (up to the nonce) as ax_4, i.e., aenc((na,pk(ska)),pk(skb)), in process 1 this is not the case in process 2. Indeed, when requesting to find an equivalent trace we see that process 2 will move into the else branch and send the decoy message aenc(nb,pk(skb)). Nevertheless, the two resulting frames are statically equivalent.
We can now navigate to the pap-1-session-attack run and inspect the details og to Query 1. This time the tool tells us it found an attack.
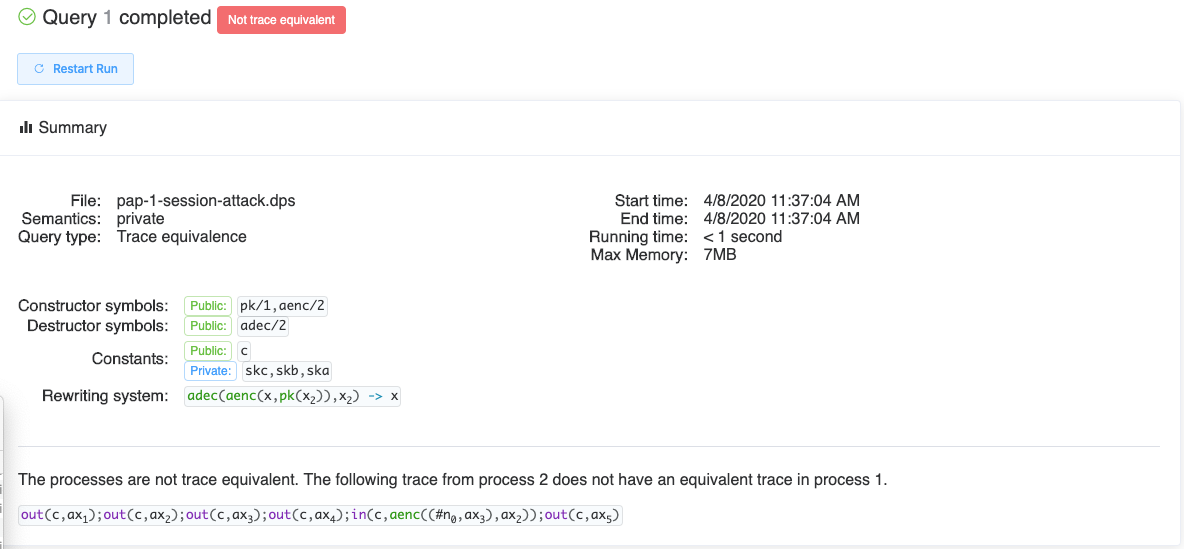
In particular we see that deepsec found the following trace in process 2
that cannot be matched with an equivalent trace in process 1. The tool proposes to allows to explore this trace in more detail by selecting Attack Trace.
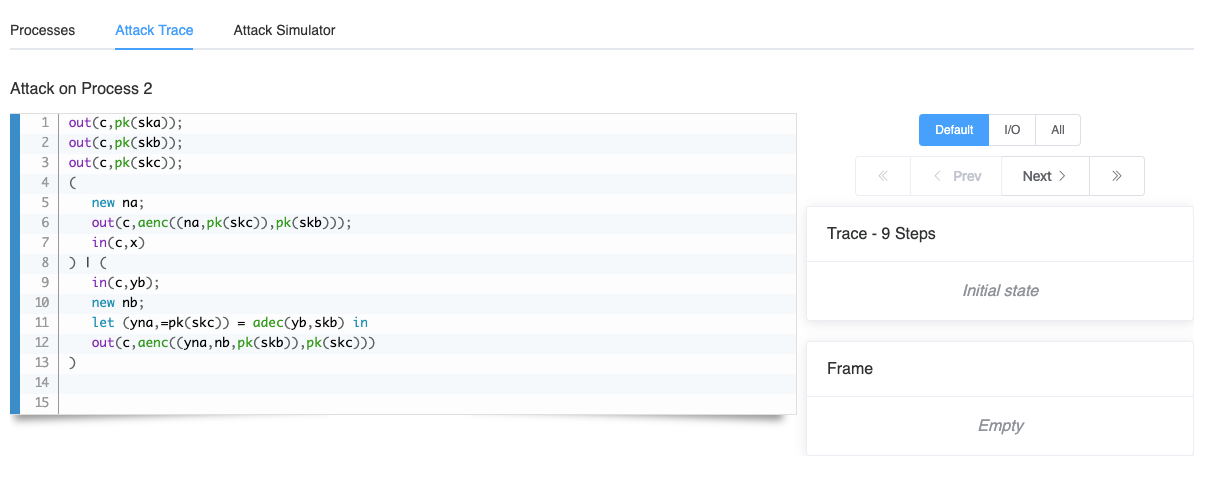
Using the <<, < Prev, Next > and >> buttons you may walk through the attack trace. Note that some of the actions, such as new na and out(c,aenc((na,pk(skc)),pk(skb))); are packed together. As the new na is not observable by the attacker the Default option is to always execute it with the next visible action. By selecting All you may choose to execute each action individually, and on the contrary selecting I/O directly moves to the next input or output. The Default option is a compromise between executing all actions and moving directly to the next io.
We may also interact more interactively with this attack trace by selecting the Attack Simulator. This allows us to manually try to simulate the attack trace from process 1 on process 2, and convince ourselves that no equivalent trace exists.
Of course the simulator only allows us to select actions that follow the attack trace. On this example we indeed end up in a situation where the last output of the trace of process 2 is not possible anymore on process 1. Recall that in the original PAP this output is simulated by the decoy message.
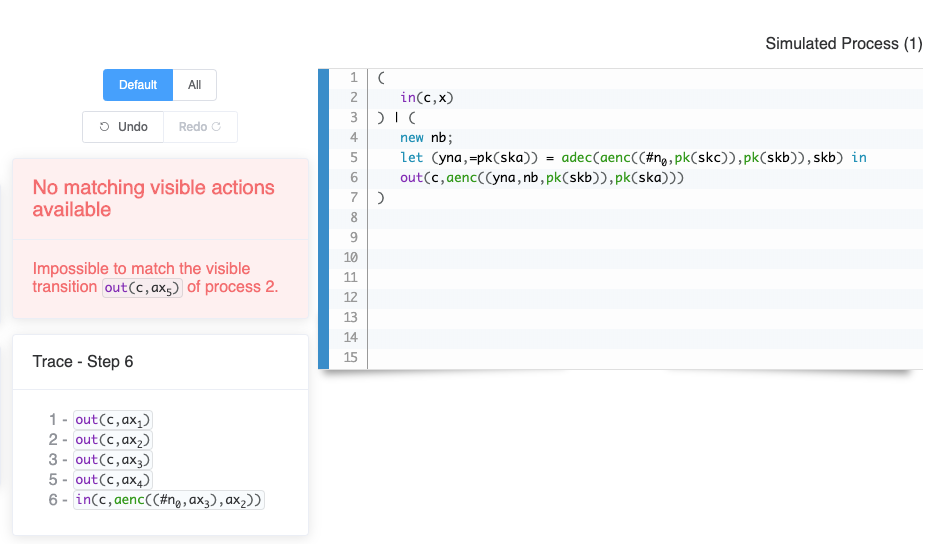
On other examples, some attacks may lead to frames that are not equivalent. In that case the tool also provides a witness on how the frames can be distinguished.
[1] M. Abadi and C. Fournet, “Private authentication,” Theor. Comput. Sci., vol. 322, no. 3, pp. 427–476, 2004.
[2] D. Baelde, S. Delaune, and L. Hirschi, “Partial order reduction for security protocols,” in Proc. 26th International Conference on Concurrency Theory (CONCUR’15), 2015, vol. 42, pp. 497–510.
[3] V. Cheval, S. Kremer, and I. Rakotonirina, “Exploiting symmetries when proving equivalence properties for security protocols,” in Proceedings of the 26th ACM Conference on Computer and Communications Security (CCS’19), 2019, pp. 905–922.

 Install
 Manual
 Source code
 Publications
